Showing posts with label Sioux Prairie Quilt Guild. Show all posts

Monday, March 9, 2015

The Last of the Shoulds

This weekend I got to go on a quilt retreat with my guild. I love getting together with these ladies, but lately quilting has felt like something I should be doing rather than a passion. My poor husband came home from work Friday morning to find me in a puddle of nerves contemplating staying home curled in a ball. The poor man hadn't slept in 20+ hours, but kindly spent time talking with me to figure out what the problem was. (See why I love him.) We realized that this year I've been doing a lot of "should" sewing. I've been making things for other people and focusing more on their tastes than my own. Don't get me wrong, it's great to be generous with your talents and to consider what the recipient likes, but these past few months none I've been fighting to include a whisper of my own voice in my quilts. My husband asked me what I was taking with me on the retreat and realized that my packing list was full of more "shoulds." 


I did have one more piece of required quilting that I needed to get done so Friday I focused on that. This year is the 75th annual Orange City Tulip Festival, and they asked our guild to make a quilt in commemoration of this. I figured that with my passion for design this was a project I should participate in. We decided to make a bunch of Dutch houses and buildings. The only way I could figure out to make it work was paper piecing, however now I know how to design paper piecing patterns in EQ7.


I took this picture Friday night before I called it quits. I haven't figured out how to print patterns in color so I was working from a grey scale for my paper piecing. I sewed all four houses at the same time, and only had six pieces that were wrong. Considering all of the pieces involved in these houses I think that's pretty good. Unfortunately I was so happy to move on to the quilt that was for me that I forgot to take a picture of the finished houses, but this gives you a pretty good idea of what they look like.

Monday, October 27, 2014

Fall Workshop

Saturday was my quilt guild's fall workshop. We vary between having guild members teach us a new technique and having a professional teacher come in. We've held a couple of retreats at Canton Quilt Retreat and asked the owner, Catherine Erickson, to teach our retreat this time. She's a certified Judy Niemeyer teacher and we choose to make the Compass Rose Table Runner. I was a bit hesitant since I hate paper piecing and was even less pleased when I found out that we had to use batiks. (She later changed this, but I had already used my birthday discount in May to get batiks from my LQS.) Needless to say I wasn't very excited on Saturday morning, but I love hanging out with the ladies from my quilt guild so I decided to suck it up.

I have to admit Catherine has really changed my mind about paper piecing. The methods she taught (and the extremely well organized pattern by Judy Niemeyer) actually made it somewhat easy. It also was great that Catherine told us to hand all mistakes to us and she ripped them out for us. After the third time of handing her my fabric I watched how she used a rotary cutter to cut the offending stitches. I probably shouldn't write this since my husband will read it, but on Sunday I messed up my Supernova blocks and had to rip out a double line of stitching on 32 pieces. I tried using the rotary cutter method of seam ripping and it was pretty efficient. It will take some practice before I'm as fast as Catherine, but I'm confident I've mastered the technique enough to avoid ER visits.

I was surprised that in an all day workshop I didn't finish a single block.  It was very comforting to see that the other members of the class got just as far as I did so I wasn't really any slower than anyone else. I learned so much with the first block that I think the next ones will go a lot faster. 


I'm excited to see this table runner all put together. I think I've pulled off a somewhat modern block using batiks. They still aren't my favorite fabrics, but I do like how these are turning out.


Sunday, June 1, 2014

Paint Chip Challenge Part 1

A couple weeks ago my quilt guild held our annual quilt show. I've got pictures of the quilts to show that I'm saving for the weeks I don't have anything I can share. This week I've been working on my farmer's wife blocks and my first blocks for the Supernova Friendship Swap. Since I want my partner to get the chance to see her block first I decided to share the first round of quilts from the Paint Chip Challenge. 

It was so much fun seeing how everyone interpreted this challenge. Everyone got to choose their own paint chips and could add white, blacks, and greys if they wanted. They could use a pattern or create their own design and there was no size guidelines so some people made bed sized quilts and others chose to make table runners and wall hangings.
Georgia Johnson 
I really debated grabbing this paint chip, but I wanted to have as many unique colors as I could. I love what Georgia did with all of the browns.

Mary DeYoung 
I'm not sure which magazine Mary got her pattern from, but she was inspired by the desert canons of Colorado.

Marcia McDowel
Marcia decided to do some stash busting with this. She made her quilt top first and then found a paint chip to match. I love that idea! If you look really closely at the picture you can see the hearts Marcia quilted into the space between the boxes. This girl has mad quilting skills and does everything on her home machine. 

Mary Winter
I think Mary said that this was the year of flying geese for her. I'm not certain, but I think she came up with this design herself while playing with the block.You can tell that she really had fun playing with this block and the monotone colors really makes the geese pop.

Jo Alberda
Jo makes some amazing art quilts. She has this really cool technique of essentially making fabric mosaics which she used for her challenge quilt. 

Lori Zwart
I love how Lori used her paint chip to inspire her table runner. I'm not sure if this is an original design to her or if she used a pattern.

Since there are 17 quilts that were entered into the Paint Chip Challenge I think I'm going to stop there. Keep watching for more Paint Chip quilts and general quilts from the show.

Friday, May 16, 2014

Blogger's Quilt Festival Spring 2014-Modern Quilts

I can't believe it's already time for the Blogger's Quilt Festival. I had so much fun seeing all of the amazing quilts last fall. I can't wait to see what everyone will add this time. Be sure to go check out Amy's blog to see some great quilts! This year I've decided to enter "Bloomin' Onion" in the Modern Quilts category and "Penguins on Parade" in the Original Design category (I'll share that in part 2!)

AmysCreativeSide.com

If you're a regular reader of my blog you might remember "Bloomin' Onion". I really wanted to do spring pictures, but ended up photographing this quilt during a blizzard. Since spring has finally come to Iowa I decided to do another photo shoot with this quilt. I'm writing up the pattern for this quilt, and I think this will be the cover shot. When the pattern came to me I had the name Chrysanthemum in my head. I decided to name the finished quilt "Bloomin' Onion" due to the onion backing, but it doesn't make sense for the pattern to be called that.


This year the members of my quilt guild were given a paint chip and challenged to make a quilt using at least three colors from our chip. I struggled for months to figure out what to do with my pink paint chip. One morning I woke up with the idea of a flower made using the drunkard's path block. Even after sketching the design for this quilt it wouldn't leave me alone. I pieced the top in four days (which included me going to my day job.)


Thankfully the spring quilt retreat was that weekend. We went to the quilt shop near the retreat center and I found some red onion fabric on the clearance rack. I couldn't believe how perfectly it matched my top. Saturday I basted the quilt and managed to do all of the circular quilting before the end of the day. This was my first time to do circular quilting. There is room for improvement, but I think I'll be using this style of quilting again in the future.


For a quilt label I used the fabrics from the front to make a fabric "paint" chip. Up against the white you can actually tell that the light fabric really is pink.


Sunday, April 13, 2014

In which I learn I know how to quilt

Do any of you have one of those friends who believes you are capable of so much more than you are? I took Mystery with me to the quilt shop last weekend to find a good thread for quilting her. One of the members of my quilt guild works there and gave me advice on thread color. I was figuring this is only my fourth quilt doing free motion quilting on so I was going to keep it simple with an all-over swirl. Kathy suggested that it would look really cool to do a different design in the ribbons to accent them. My initial response was, "I can't do that." She had the perfect come back, "Why not?" After helping me find the perfect thread for my quilt that little question kept haunting me. 

When I first looked through my quilting book to find the swirl pattern there was a really cool half-daisy design that I liked. Again my brain said, "That would look nice, but you can't do that." All of the sudden I heard Kathy asking me "Why?" I flipped through the book and found a leaf that would be really pretty in the ribbons and decided to try it. 


Turns out I'm better at quilting than I thought I was. It's not as perfect as I want, but an amazing thing happened when I laid it out on the bed and took a step back. All the little imperfections weren't so noticeable anymore. Amazing how much better the quilt looks with that single step back. Now if I can decide what to do for the borders. Any suggestions?


Check out that cute little leaf. I hate to say it, but Kathy is right. I can quilt!


Friday, April 4, 2014

Bloomin' Onion


Recently on facebook on of my friends asked how frequently we listen to our inner quilter voices. I replied that I my inner quilter voice is loudest at 4a.m. Usually I can ignore it for a couple of hours and then write down my ideas when I'm ready to be awake. This quilt was different. After months of struggling with different ideas for the paint chip quilt I woke up one morning with a full design in my head. I love the drunkard's path blocks and the 7" size go together really fast so a few hours later I had this stack ready to go.

This idea wouldn't let me sleep so I found myself sewing a couple of hours before work each day and was finished with the top on Wednesday. Friday afternoon I found a great backing fabric and variegated pink thread and was back to work on this quilt the next morning. After basting the quilt I traced a spool of thread in the center to give me a circle to follow. I used my darning foot for the first few rounds and then switched to my walking foot. I did pick out my first attempt. The second attempt isn't as perfect as I want, but its pretty good for my first time doing circular quilting.


March in Iowa is very brown and muddy so I didn't want to lay this quilt on the ground. Spring (at least green grass) usually shows up over the course of a week and I was hoping for that to happen. I held out until yesterday afternoon when we were struck by a blizzard. Another quilter on facebook encouraged me not to let the forecast cancel my plans so after work I headed out with the quilt. I don't think she meant I was supposed to take pictures during the blizzard, but I kind of like all of the snow on the quilt.


My husband and I went out last weekend for my first attempt at photographing this quilt. There wasn't any snow, but the wind proved to be a challenge. Thankfully I was able to get one shot that showed the whole quilt (and is snow free!)


When I got inside from the blizzard photo shoot I hung the quilt in our hall to dry. I love how quilts will naturally drape themselves into beautiful arrangements. You can see the red onion fabric I used for the backing and binding and understand why this quilt has been named, "Bloomin' Onion."


Bloomin' Onion
original pattern
Kona Solids
56"x56"

Sunday, March 23, 2014

Spring 2014 Quilt Retreat

Last weekend a bunch of women from my guild went to Canton Quilt Retreat for a retreat. I had so much fun. It was really laid back with everyone working on our own projects. On Friday I focused on the Crosshatch Bag from Vintage Quilt Revival. I'm not a huge fan of paper piecing, but I loved this bag enough to give it another try. Catherine (the owner of the retreat center) is a Judy Niemeyer teacher and she showed me the JN way of paper piecing. I can't say that paper piecing is my favorite way of assembling a quilt block, but I'm no longer terrified of it. (Don't tell anyone, but I'm almost excited for the Fall workshop where we'll make a Judy Niemeyer table runner.)

I got all of the paper pieced bits done for my bag. Sadly I didn't check for pattern errors before leaving so I only got this far on my blocks. Thankfully the pattern gives you room for errors so I have enough of the light blue and white to recut with the proper measurements. I haven't had a chance to redo the middle section, but you can see that this block will look awesome when it's done.


Of course Friday before supper we went shopping. I found a cute charm pack for Bluebird Park. (Can I just say hedgehogs and fabric!!!!) I also found a jellyroll of Twenty-Three that had been marked down to twenty dollars and got a spool of grey thread to use for piecing and quilting. I find grey is becoming my go-to thread color for quilting.

Before the retreat I was able to finish piecing the top for my paint chip quilt. At the quilt shop I found a multi-colored pink thread, some batting, and backing so I was able to do the quilting on Saturday. I'm not completely in love with this quilt so I'm just sharing some sneak peaks right now. I tried several new things which I think is why I'm not loving this quilt. First off I used Quilter's Dream Cotton. Normally I use Warm & Natural, but the quilt shop only had Quilter's Dream. I've never had a batting pill as much as this one did. I'm sure it will look better when it's washed, but I've never had to wash my quilts before using them. (I know this is a horrible admission, but our apartment only has coin operated  laundry and we have really hard water here so I avoid washing my quilts if I can.) I also tried spiral quilting for the first time. The outer edges look decent, but it's obvious that I struggled at the start. (Note all those little white bits...that's the batting. Yuck!)


I found this red onion fabric on the clearance table for $3.75. The pinks and reds match the quilt top perfectly so the ladies on the retreat convinced me it was a good back. I'm still not sure about the onions, but they're growing on me. One of the ladies convinced me to use some of the leftovers for the binding. I loved only needing to cut four strips and the fabric looks really cute as a binding.

I'm going to try and get this quilt washed this week and maybe next Monday I'll be happy enough with it to show the final pictures. 

Sunday, March 9, 2014

Think Pink

I can't remember if I've mentioned my quilt guild's challenge this year or not. This year (at least as far as the challenge goes) is all about color. I was so excited when it came time to sign up for committees and I got to be on the challenge committee. Even more exciting was no one signed up at first so I didn't have to argue convince anyone that the paint chip challenge was the way to go. (One of the other members has joined the committee which will be really nice when it comes to setting up the quilts at the show, but she loved the paint chip challenge so I still got to go ahead with it.) 

My goal with this challenge was to let everyone have fun so there aren't a lot of rules. I think it confused some people at first because they'd ask questions and my answer was usually to shrug and say do what they want. In September everyone got to pick a paint chip to use as a color pallet for a quilt. (I debated putting the paint chips in an envelop, but I knew I wanted to pick mine and it didn't seem fair not to let everyone else choose their colors too.) The rules are to use at least three colors from our paint chips and we have the option of adding a neutral like white, black or grey. We can use prints provide all of the colors in our print follow our paint chip's color scheme. We have the option of designing our own quilt or using an existing pattern.  We're showing the completed quilts at our meeting in April so time is really running out on my quilt. This is the paint chip I chose.


I'm ordered some solids from Fat Quarter and discovered that my monitor isn't very accurate when it displays colors. The colors work together pretty well, but I'm worried about the two darker pinks not matching the paint chip very well. I do know where the paint chips came from so I could go find one with more pinks, or I might just let it be. It's somewhat hard to tell, but the lightest color is a very pale pink (surprisingly that one is an accurate match to my paint chip.) I've debated a few blocks, but I finally decided to keep it simple. Last winter I took a workshop on the drunkard's path block and fell in love. These blocks finish at 7" so it's going together pretty quickly. Next weekend I'm going on an overnight retreat with some ladies from my guild and I hope to finish up this quilt.

In honor of today's pink theme I decided I'd also share a picture of the tulips that are on my kitchen table. We still have a fair bit of snow outside so I've really loved seeing this promise of spring every morning when I wake up.


Monday, February 3, 2014

2013-14 Mystery Quilt Step 6

The final step is a little bit complicated. Basically you alternate the blocks made in steps 4 and 5 lining up the HSTs in the Contrary Wife with the lower HST in the Churn Dash. By twisting the direction of Contrary Wife every other way it creates this interesting woven pattern. 
You can go here for the official pattern.


I tried to take this top outside to take some of those beautiful snow pictures I see everyone else taking. Unfortunately I forgot about the fact that my glasses have tinted lenses that get darker when I go outside so all of my pictures were over-exposed beyond the point of saving. Combining that with the bitter cold and the wind that kept stealing my top I've decided to save outside pictures for the spring. 


My husband and I have started scouting locations for photo shoots and have found some great possibilities. I'm sorry for teasing you, but please bear with me during these winter months. Better pictures will be coming.


I went back and forth on including these borders. Most of the quilts I've made so far don't have borders, but I decided to trust the instructions and include them. I'm so glad I did. The green was a bit over powering, but with the tan and purple borders it really helps control it. I love the HSTs in the corner of the first border. 

Monday, January 27, 2014

2013-14 Mystery Quilt Step 5

I have some confessions to make before I begin this week's post. First: I bought the fabric for this quilt because one of the new Kona colors is called Kiwi and I love both the Kiwi bird and fruit. I did like the shade of green, but I picked it because of the name and found colors that I thought looked good with it. I also picked colors based on how they looked on my computer screen. I've since ordered a color card so next time I order solids I'll know exactly what color I'm getting. Second: I followed the link in my first post to see what the finished quilt looks like. I know this is cheating, but I didn't want to change the design without first knowing what the design is.
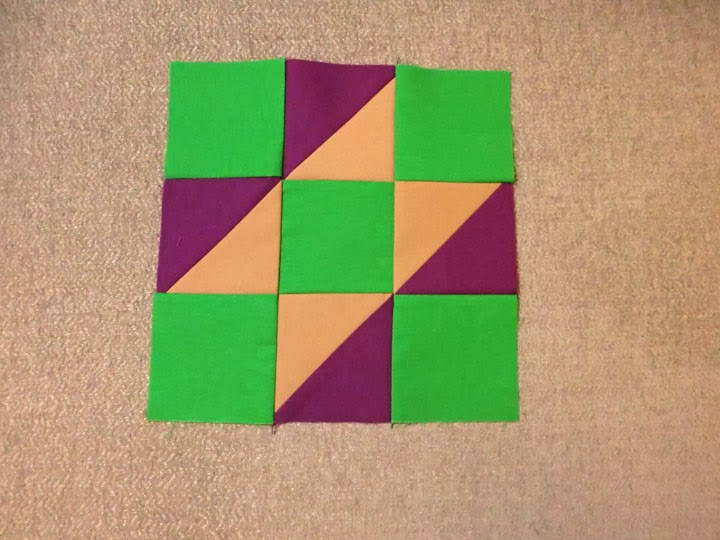
Step 5 calls for the remaining HSTs and the 3.5" light/medium blocks to be sewn together. (I was looking at my Farmer's Wife group and saw this block is in that quilt too. I'm sure it has many names, but in the Farmer's Wife it is called Contrary Wife.) This is where the risk of buying fabric online comes in. I was a bit hesitant when it arrived, but I decided to go with it. Then as I was cutting I found out that I only had 1/2 yard instead of 3/4 of a yard and didn't get the 74 squares called for. As I auditioned it with the last week's block I became more frustrated with it. It clashes a little bit in the picture, but on the ironing board the lilac really showed that it didn't belong.


The good part of buying fabric because of the name is I bought lots of it. My thought had been I would use it to bind the quilt, and possibly use it in a pieced backing. I had enough green to cut seventy-four 3.5" squares and there's still a bit left over. (I told you I liked the name fabric.) I love how the green looks with the tan and purple.


I tried four blocks together to see how they look. I am so glad I decided to use the kiwi instead of the lilac. It really brings the quilt to life. I can't wait to share the finished top next week. Hopefully the weather will be nice enough that I can get some shots outside in good light.


Monday, January 20, 2014

2013-14 Mystery Quilt Step 4

In November I wrote about the first three steps (herehere, and here) about the mystery quilt along that my quilt guild is doing this year. I was sick the night step 4 was handed out so this project was put on hold for several weeks. I was really worried when our January 6th meeting was canceled due to extreme cold, but thankfully the organizers of the mystery e-mailed us steps 1-5 so we could keep working. I've seen the churn dash block popping up all over the place and was so excited to discover step 4 had us using the HSTs from step 2 and the divided squares from step 3 to make 14 churn dash blocks. 

Saturday, December 7, 2013

Sioux Prairie Quilt Guild Christmas 2013

This week my quilt guild had our annual Christmas party. It's always one of my favorite parts of the holidays. We have a big potluck, play a few games, and exchange quilt related presents. 
When we arrived there were donuts sitting on our plates. All of us were a little confused and asking if we really wanted to eat a donut at 6:00 at night when we had a potluck of yummy salads and desserts awaiting us. Then we got closer to the tables and discovered that the donuts were really these super cute felt pincushions. Each of us also got a template for a 5" half hexagon! I've been wanting to play with this shape but haven't gotten a template or one of moda's precut hexie packs yet. The best part is that the half hexagon works with charm packs and jelly rolls which is one of the few things I actually have in my stash.


The games were very creative this year. We're a large group and fill several tables so that's how our teams were decided. Everyone had to take a needle and each team was given a spool of thread. We then raced to see which team could get all of their needles on the thread first. The ladies at my table have lightening fast threading abilities and I'm pleased to report we won!  Our prize was a fat quarter and I chose the blue fat quarter in the picture below. For the second game we had to bring a fat quarter to exchange. We got to choose a fat quarter from the basket and had to toss it into a tub a few feet away. You'd think it would be easy, but those fat quarters really catch air when you throw them. Thankfully everyone who missed (including me) got to choose a fat quarter from the basket at the end of the night and I got to bring home the lovely little black and white print.


The evening ended with our gift exchange. Since we're all quilters we wrap our gifts in fabric which is how I got the green fat quarter in the picture above. We drew numbers to decide the order we chose gifts in. From there we could either take a gift from the table or steal one of the gifts that had already been unwrapped. The stealing part is always nerve wracking because if you draw something good you don't want anyone else to take it, and you want your gift to be concerned good enough to be stolen. (I'm pleased to report that the table runner I made was stolen once!) I was nice and picked one of the wrapped gifts and got a great little box bag for carrying all of my tools to workshops/retreats/work nights and a charm pack of Bobbin and Bits. I'm loving this fabric line and I think it might be destined for some play time with my new hexagon template. 


One final note not related to the Christmas party, but still exciting. I recently found OttLite bulbs at JoAnns that fit in a regular lamp! I've wanted an OttLite for a while, but the ones that I can afford if I spend a year's worth of birthday and Christmas money are the "cheap" ugly plastic ones. They'd work okay in a craft room, but I do most of my hand work in our living room where I want something a little more stylish. The light bulbs are a bit pricey at ten dollars a bulb, but that's significantly cheaper than the lamps. It's been really nice having a great light for knitting (haven't done much quilting this week.) This morning while taking pictures for the blog I realized the true value of this light bulb. I'll admit I was feeling lazy today and decided to use my point and shoot camera for pictures instead of setting up my DSLR. I occasionally do this and then use photoshop to make the pictures look good. (I know it's not the best practice, but it's the lazy one.) Because of my awesome new light bulb I didn't need to do any editing on my pictures! If you're trying to figure out how to take good photos in the winter with the crummy light the northern hemisphere gets this time of year (or next June for those in the south) I'd definitely recommend investing in one of these bulbs.

*This post has not been sponsored by anyone. I find it challenging at times to find quality items and when I do I want to share my finds.

Friday, November 29, 2013

2013-14 Mystery Quilt Step 3

Sorry for the recent absence. I'm not really sure what bug hit our house, but it was not a nice one. Thankfully health has slowly been working it's way back in among us. 

Step 3 for the mystery quilt along is a very easy one. Take the 2" strips you cut in step 1 and strip piece them.  After you press you should have 5 sets that look something like this.


Next cut your strip sets into 3.5" blocks.


I told you step 3 was an easy one. Unfortunately the illness that hit our house prevented me from getting to the meeting where step 4 was handed out so this quilt might be headed for a little bit of a break. Probably a good thing since there are quilted Christmas projects that need some love.


Saturday, November 16, 2013

2013-14 Mystery Quilt Step 2

Last week I shared Step 1 of the mystery quilt I'm currently participating in with my quilt guild. Not surprisingly this week I got to start sewing some of the pieces I cut in step 1. 

Using the (60) 4" squares of medium/dark2 and the (60) 4" squares of light fabric, make 120 half square triangles. Square up blocks to 3.5". 


I have to admit I am falling a bit behind. I have all of my squares sewn and pressed, but only have trimmed about 20. I also need to finish working on step 3 this weekend since I think they'll be passing out step 4 at Monday's meeting. Hopefully this weekend will see some good sewing time and I can get back on track.

Saturday, November 9, 2013

2013-14 Mystery Quilt Step 1

I'm super excited with my quilting projects right now. Unfortunately I really can't talk about any of them right now so I hope you'll bear with me for a few weeks. One of the projects I can share is the Mystery Quilt I'm working on. Since I'm not sure how long my other secretive projects will take I'm going to release the steps one at a time. 

I talked with the ladies running the Sioux Prairie Quilt Guild's Mystery Quilt this year and have gotten permission to share the steps on here. The pattern is from http://www.quiltbug.com/Free/catercorner.htm (I'm keeping the mystery in this quilt so I haven't visited the site yet.) I was super excited to learn that this pattern is from the Cystic Fibrosis Foundation. One of my best friends has CF and is organizing her first Great Strides Walk in our home town next summer. Check out her blog Life of Cheriz for all the details. I haven't figured out all the details yet, but I think I'm going to raffle off this quilt somehow to raise money for her walk. Okay, enough of me babbling and on to the quilt. 

Clue #1
Fabric Requirements and Cutting Instructions
Light: 2 yards (may choose fabric to "fussy cut" on cutting instruction 2. If you choose to do this you                               will need more fabric)
Light/Medium: 3/4 yard
Medium/Dark 1:3/4 yard
Medium/Dark 2: 2 yards
Binding: 1/2 yard-this can be the same as the 2 yards of Medium/Dark fabric

All strips refer to Width of Fabric (WOF)

  • Cut 7 strips 3.5" wide by the WOF of the light/medium fabric. Subcut these strips into (74) 3.5" squares.
  • Cut 2 strips 3.5" wide by the WOF of the light fabric. Subcut these into (14) 3.5" squares. *These can be fussy cut if desired.
  • Cut 5 strips 2" wide by the WOF of the medium/dark 1 fabric.
  • Cut 5 strips 2" wide by the WOF of the light fabric.
  • Cut 6 strips 4" wide by the WOF of the medium/dark 2 fabric. Subcut these strips into (60) 4" squares.
  • Cut 5 strips 3.5" wide by the WOF of the light fabric. These will be used in the boarder.
  • Cut 6 strips 4" wide by the WOF of the medium/dark 2 fabric. These will be used in the second boarder.

All of my fabrics are Kona Solids. I'm using Wheat for my light, Lavender for my light/medium, Kiwi for my Medium/Dark 1 (I'm also planning on using this for the binding), and Dark Violet for my Medium/Dark 2. 

Unfortunately when I ordered my fabric I entered the correct amounts, but they only sent me 1/2 a yard of Lavender. I haven't decided yet if I'm making a smaller quilt, substituting another fabric, or ordering more Lavender. I'll probably make that decision as I get more steps and see how things are looking.

Saturday, October 26, 2013

New Fabric

Thursday was such a happy day. I got a box of fabric from Fat Quarter Shop for two quilts and a box from my MIL full of Halloween goodies. My excitement level was about equal with the fabric box coming out slightly ahead (come on, it's 5.7 pounds of fabric.) When I got home from work my husband and I were digging through the boxes and discovered she sent us individually wrapped peeps!!! I didn't even know they made Halloween peeps let alone individually wrapped ones. The glare on the wrappers is too harsh so there's no pictures of them. :-(

Happily the fabric has no glare so I can share photos of what I got. Every year my quilt guild does a challenge and a mystery quilt. This year they even let me plan the challenge quilt! I might be driving some of them a bit nuts with my loose rules, but I want everyone to have fun. When I announced the challenge I handed out paint chips and participants must find fabrics that match at least three of the colors on their paint chips. Fabrics can be prints so long as the colors on their prints match the colors on their paint chips. We're also able to use neutrals such as black, white, and grey. 

I'm not completely sold on the two fabrics furthest to the right. They lean a little more towards the red scale than the purpley pink I was hoping for. I've decided one of the things I'm adding to my Christmas list is a color card from Kona. I'm really embracing using solids and can't wait to get a swatch of all of fabric colors Kona offers.

I attempted to participate in the mystery quilt along the first year I joined the guild. I did okay with altering the fabric (i did a two-step process of bleaching and then when it was too light coffee stain), embellishing the fabric with quilting, cutting the fabric into seven pieces and reassembling, and adding beads and buttons. My mystery quilt was turning into this cute little bookcase runner with 7 owls. Then the last step instructed us to turn our fabric into a vessel. I couldn't figure out how to turn my bookcase runner into a vessel and the beading on my owl wings was becoming ridiculous. My owl runner currently languishes in UFO purgatory. I have trouble calling projects UFO because in my mind if I intend to finish it and have a plan of when it will be worked back into the schedule/finished it's still a WIP. To refer to the owl runner as a UFO tells you that their hopes of being finished are zilch. 

This year's mystery quilt we've already been told will finish as a quilt. Our guild makes Comfort Quilts for the DA to hand out to victims of violent crimes and their families, and to an organization that assists women and children leaving domestic violence situations. This year's organizers have planned a quilt that will finish 50"x76" which is one of the requested sizes for comfort quilts. We aren't required to give away our quilts, but I've decided my mystery quilt this year will be a Comfort Quilt. 


I forgot to ask when they handed out the first step, but I'll talk to the organizers of the Mystery Quilt and see if I can share the steps here.

Saturday, June 1, 2013

SPQG 2013 Quilt Show part 2 (and some sneak peeks)

This is the second half of my pictures for the quilt show. (There were many more beautiful quilts, but if I share everything I'll be posting quilt show pictures all year.)

It's hard to tell in the picture, but lots of the accent pieces have touches of color. 

Not Quite Black and White by Natalie Brummel

Virg made this quilt when her brother retired from the Post Office. It honors his years as a mail carrier and his military service in Korea. 
(This quilt won member's choice.)

May America Always Be Free by Virg Oordt

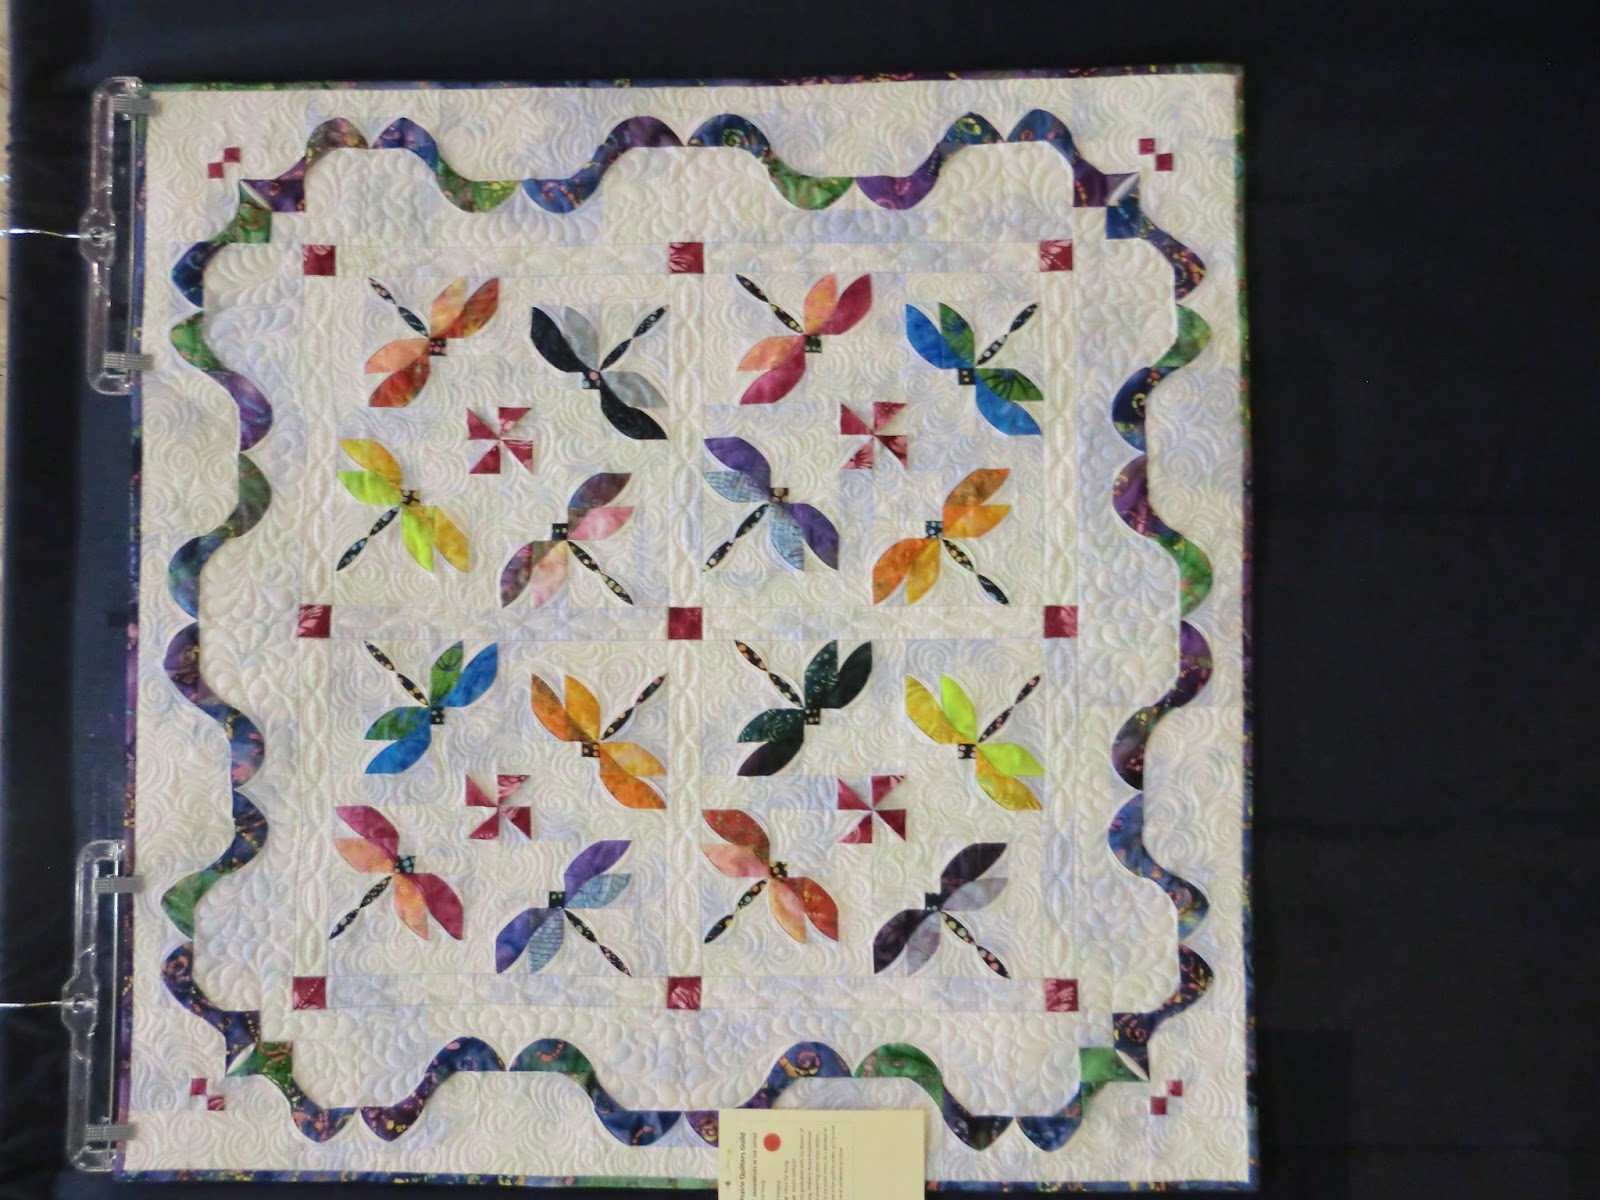
Mary graduated with her Master of Science in Nursing this year. 
She made this quilt to hang in her exam room. 
Dragonflies in the Office by Mary De Young

This is one of the quilts from our Winter Workshop. 
Dancing Daisies by Mary Zagaeski


These are three of the challenge quilts this year. In order to encourage people to vote for the best quilt rather than their family or friend's quilt these are unlabeled aside from their voting number. 


(Out of the Box was my entry into this category.)

Finally here's a sneak peak of this summer's year's new quilts.
The first time I saw Comma I knew it would be perfect for my husband. After talking with him he came up with the name "Writer's Block" and I've come up with a pattern to match the name.

I'm joining Kathi from Design Originals by KC for her hand quilt along. This is going to be a memory quilt in honor of my puppy. I plan on machine piecing blocks from the light fabric and then hand appliqueing paw prints with the rainbow blocks.